Ear Post Rivets - page 4
©2004 Judith Hoffman
1 | 2 | 3 | 4
An alternate way to form your rivet head would be to just tap lightly with the round face of a 2 or 4 ounce ball peen hammer. Work around the top of the cut-off post in a little circle, striking the edge, not the center (figure 1). As the rivet domes over, (figure 2) it will begin to flatten onto the metal surface. You can make it almost disappear with enough hammering. If you want your rivet head really flat, turn the hammer over and use the flat face when the head is a dome and has touched the metal. If you are using rivet heads for texture you could just hammer them enough to form a visible rivet head. Then turn the piece over and hammer the ear post pad slightly to give it some texture and disguise its machine made origin.
To avoid marring your metal with hammer blows you can punch a small hole in a piece of cardstock or file folder. Position the hole over your rivet and hammer the rivet down. (You will only see the rivet head in the small hole, the card stock will be protecting the rest of the book page.)
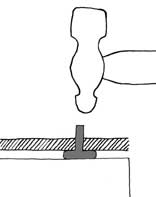
Figure 1. The rivet sits on the steel block with a small amount sticking up out of the piece of brass. This will be domed over to form a rivet head.
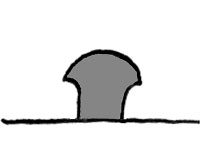
Figure 2. The rivet head as it starts to dome over.